IntuiSwitch™
Turnout Controllers by ESELCO
The Paired Option for IntuiSwitch™ Controls
When to use paired controls
Use paired controls whenever you have a single turnout or a pair of turnouts operating together that you would like to be able to control from two different locations. An example is a turnout on a long peninsula, where you'd like operators on either side of the peninsula to be able to throw the turnout.
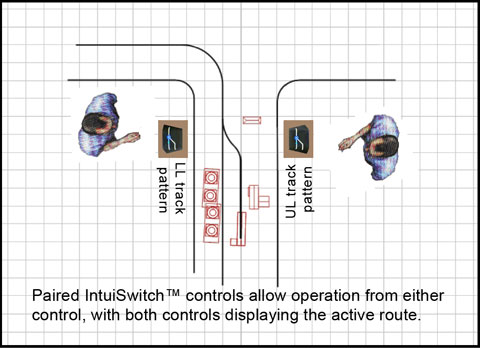
Choose the track pattern of each IntuiSwitch™ of the pair to match the turnout as seen from that control's location.
Another use for paired controls is on layouts at train shows or other public locations, where the the layout may have a public-facing side of the track and a staff-facing side of the track. V2.0 of our IntuiSwitch™ controls include the ability to individually enable or lock out the
pushbutton each control in a pair. This is handy for locking out input from the public-facing control while still enabling staff control of the turnout from the other control of the pair.
The controls still displays the actual turnout status even when the pushbutton is locked out. The locked-out control can be re-enabled after the show.
How to hook up paired IntuiSwitch™ controls
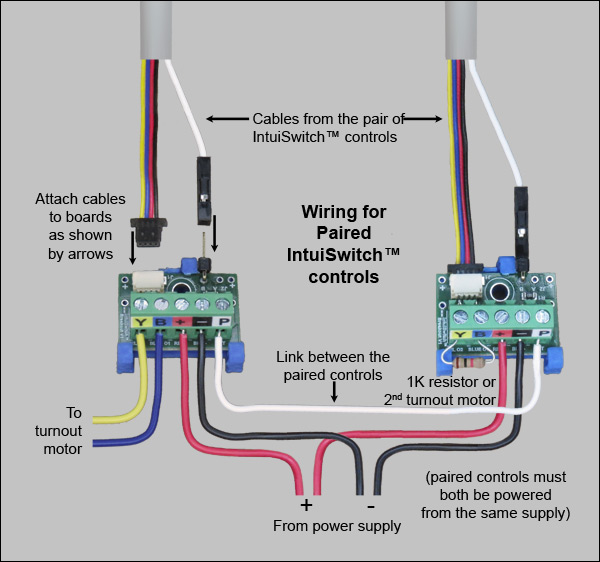
The paired option controls have an extra wire in their cable and on the terminal block of their breakout board. This additional wire is used to synchronize operation of the IntuiSwitch™ with another IntuiSwitch™ control that also has the paired option. Connect the power terminals of both controls to the same power source. (The black (-) terminals of both controls be connected together.) If the pair is to drive a single turnout, wire the turnout motor to the yellow and blue output terminals of one of the paired controls, and the supplied dummy load (1k ohm resistor) to the outputs terminals of the second control. If driving two turnouts, wire the second turnout motor to the output terminals of the second control. Add a wire connecting the P (pairing) terminals of the two IntuiSwitch™ controls to each other.
Initially, the two controls may be out of sync, with one showing the opposite track turnout status from the other. If this happens, temporarily disconnect the pairing wire between the paired controls, press the button on one of the controls to flip it without changing the other control, then reconnect the pairing wire. (With V2.0 controls, you can accomplish this using a magnet without disconnecting the pairing wire. See Customizing IntuiSwitch™ V2.0 Controller Operation for details. Once synchronized using either method, the controls will remain synchronized as the b button on either of the paired controls is pressed.
Paired operation with our -H (hybrid) IntuiSwitch™ controls
The special-order -H (hybrid) IntuiSwitch™ controls can be paired with each other with no special option necessary. (Contact us for an app note covering this.) But -H IntuiSwitch™ controls can not be paired with a standard IntuiSwitch™ control.
Ordering the paired option
The paired option is available for both of the two mounting styles (Classic IntuiSwitch and D-IntuiSwitch). The controls being paired do not have to be the same track pattern or mounting style. For example, you might pair a Classic IntuiSwitch™ on the fascia near the turnout with a D-IntuiSwitch™ in a central control panel.
The paired option adds $3 to the regular $15.95 price of each of the two IntuiSwitch™ controls being paired. These are special order items, assembled on demand, so may take a week longer than our standard versions for delivery.
We accept payment via PayPal and major credit cards.